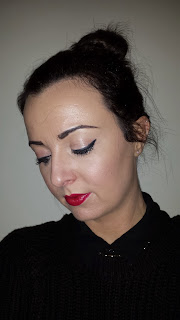
Good morning ladies,
Firstly I say 'type' look because I cannot say for sure that what I class as vintage is in fact right as I'm not a Make Up Artist myself, but I have kept an eye on the trends and this seems to be everywhere!
Black winged eye liner and red lips!!!
To set off this look I find having a strong brow can really enhance the liner lip look.
Eye liner can be tricky business at the best of times, with many ways to apply it; pencil, gel, liquid and even markers.
I personally use either a gel or liquid on my top line and a pencil on my bottom waterline.
To begin to create a good flick you need to firstly accept this takes time, I say this because for ages I thought the only way to create a flick was to do it all in one sweeping motion and then I wondered why it always looked so messy!
*If you are using a gel and a brush, apply some of the gel to the back of your hand and dip your brush in. There are two types of brush I use, a pointed liner brush and a slanted liner brush. Sometimes I would find the pointed brush easier*
The first step is to apply liner to the center of your lid. The inside of your eye should always have the thinnest liner and then the line should get thicker as you move towards the outer corner of your eye.
The second step is to fill the inner corner of your eye. Try keep as close to the lash line as possible here to keep it nice and thin. (This can be difficult with liquid sometimes it ends up in my eyeball which is quite painful)
Next apply liner to the outer corner of your eye getting thicker as you move out. If using a brush of any kind, take your time, little by little.
You may need to stretch your eye out to create the flick. Hold your skin out towards your temple and follow the brush movement upwards. This may look odd at the start as it does not join the corner of your eye but this is ok as you will join it together in the next step.
You fill in the gap by creating a triangle and filling it in. The triangle should go from the outer corner of your eye pointing upwards towards your brow and meeting the thicker outer liner on top of your lash line.
A further option is to smooth out the line with black eye shadow on an angle brush if you want it looking nice and even.
For your bottom lashes, I usually use a pencil and lightly apply it to the lash line for this look rather than the waterline.
Adding lashes and mascara finishes off the beautiful 'cat eye' look.
Brows are defined as described before in my Eyerebrushed lesson, filling in the bottom line of the brows first, followed by the top and then working into the gaps. You only apply lightly to existing hair to keep the colour consistent but if you want to create the HD look, be sure to edge off the inner corners of the brow into an almost square look.
Applying lip pencil should always be carried out with a sharp lip pencil. Working from the outside in, lightly apply the liner taking extra care when working on the cupids bow. If you have thinner lips and would like them to look fuller, you can add liner to the top of your lips and then when you apply lipstick, your lips will appear fuller.
Lipstick again should be applied using a small lip brush, using a 'bullet' as they are called, can smudge and ruin all the effort you put in with your pencil so be careful to apply little by little but ensuring to apply right into the corners of your lips so you don't look silly when you smile :)
When creating a vintage look, I love using my MAC Russian Red lippy but another great colour is the Catrice My Red Card.
A light contour/highlight and blush can be applied when creating a vintage look but they real focus on your face should be your brows, liner and lips.
Hope this helps, I'll be sure to post a step by step pic soon and you can all be vintage fab this Christmas. My own pics this morning I tried using a pencil.... not as easy so I think its back to gel for me :)
Stay beautiful,
Emma x


No comments:
Post a Comment